How to Use ColabaseAI: AI Image Prompts, Models, and Marketing Visuals
Use ColabaseAI's prompt gallery to find AI image prompt examples, pick a model, edit prompts, generate variations, and save visuals for ads, blog covers, posters, and product launches.
Most AI image generators start with a blank prompt box.
That is usually the slowest place to start.
When you need a visual for a launch page, a social post, a blog cover, or a seasonal campaign, you may not know the perfect prompt yet. You might only know the job the image has to do: show the product clearly, feel premium, fit a mobile ad crop, leave room for a headline, or match a brand color palette.
ColabaseAI is built for that middle step.
Instead of asking you to invent everything from scratch, ColabaseAI lets you start from real AI image examples, inspect the prompt behind each image, choose a model, generate your own version, and save the results you may want to reuse later.
This guide walks through the basic workflow: browse the Inspiration Gallery, open a prompt, edit it for your project, choose a model, generate variations, and keep the images that are useful for future work.
What ColabaseAI is useful for
ColabaseAI is an AI image generation workspace for people who need practical visuals, not just experiments.
It is especially useful for:
- Blog covers and article illustrations
- Product launch graphics
- Website hero images
- Social media creatives
- Posters and campaign visuals
- Product shots and ecommerce images
- App icons, thumbnails, and other small-format assets
The main idea is simple: start with a visual direction that already works, then adapt it to your own product, topic, or campaign.
That saves time in two ways. You do not have to write an AI image prompt from zero, and you do not have to guess which kind of prompt structure fits the image you want.
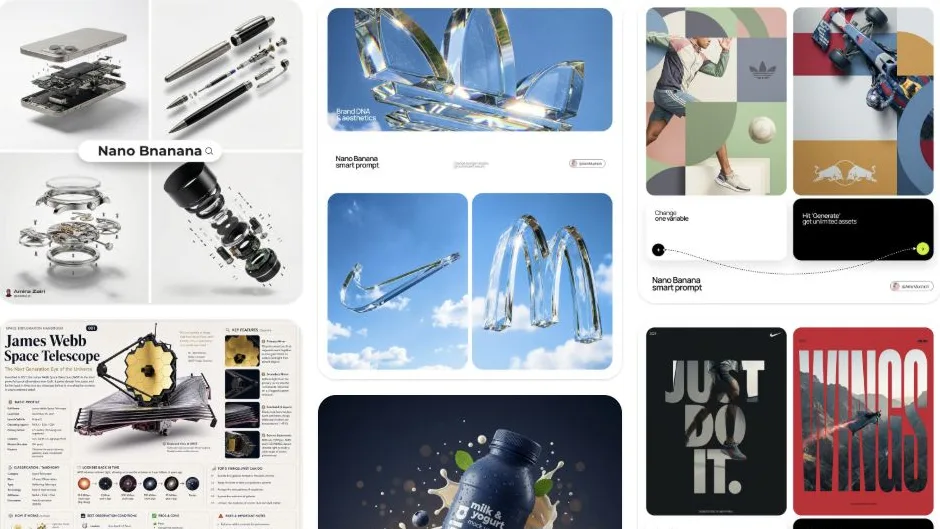
Step 1: Start in the Inspiration Gallery
Open the Inspiration Gallery.
The gallery is the best place to begin because it gives you finished images first. That is more useful than reading a long list of prompts with no visual result attached.
When browsing, do not look for a perfect match. Look for something close enough to your goal.
| Your goal | What to look for in the gallery |
|---|---|
| A blog cover | Editorial compositions, clean backgrounds, readable focal points |
| A product launch visual | Hero shots, product-led layouts, dramatic lighting |
| A social post | Simple compositions that still work on a small screen |
| A poster | Strong typography, clear hierarchy, bold color contrast |
| A product shot | Clean product framing, controlled lighting, minimal clutter |
A useful gallery image can give you a composition, mood, lighting style, or prompt structure. You can change the subject later.
Step 2: Open the image and read the prompt
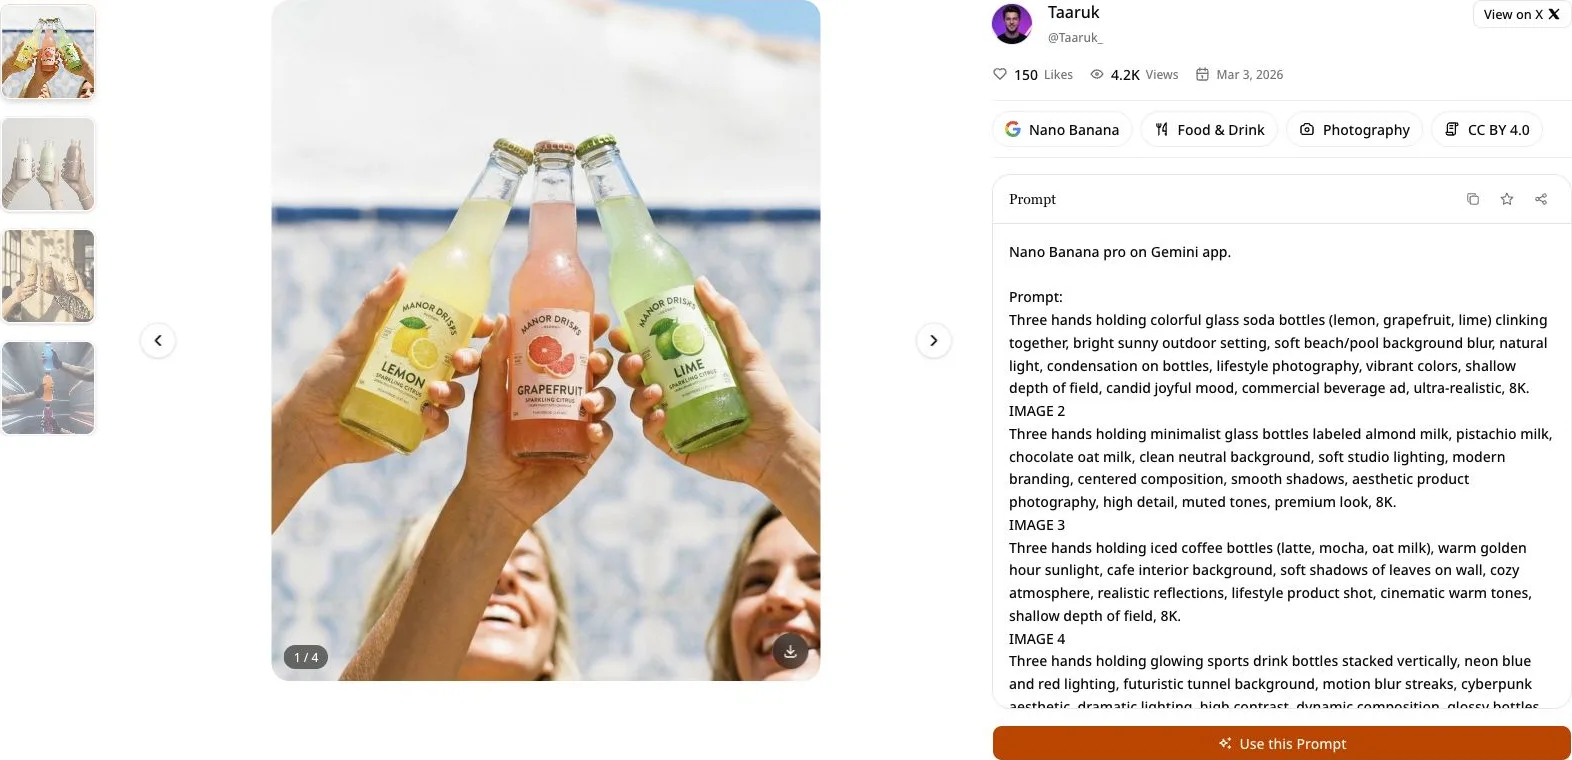
When an image catches your eye, open its detail page.
Before copying the prompt, read it like a creative brief. A good AI image prompt usually contains several parts:
- Subject: what the image is about
- Scene: where the subject appears
- Composition: how the image is framed
- Style: photographic, editorial, 3D, illustrated, poster-like, and so on
- Lighting: soft studio light, dramatic shadows, daylight, neon glow, etc.
- Constraints: background, aspect ratio, text behavior, color palette, or mood
This is the part that makes a prompt gallery useful. You are not just copying words. You are connecting the words to the image they produced.
Once you see that connection, it becomes much easier to decide what to keep and what to change.
Step 3: Edit the prompt for your own use case
Do not treat gallery prompts as fixed text. Treat them as a starting point.
Imagine you find a prompt for a coffee poster. You like the warm lighting, centered composition, and premium editorial style, but your product is a desk lamp.
You do not need to rewrite the whole prompt. Keep the structure and replace the important details.
Original direction:
A premium coffee poster with a warm ceramic cup, soft morning light,
minimal background, editorial product photography, clean headline space.

Adapted direction:
A premium product launch visual for a matte black desk lamp, soft warm
light spilling across a clean desk, minimal background, editorial product
photography, clear space for a short headline.
That small edit changes the subject while keeping the visual logic.
When editing a prompt, change these parts first:
- The product, topic, or main subject
- The use case, such as blog cover, poster, ad creative, or hero image
- The background and environment
- The brand mood, such as playful, premium, calm, technical, or energetic
- Any text requirement, especially if the image needs a headline or label
A practical rule: keep the prompt structure, but replace the nouns that make it specific.
Step 4: Choose the right AI image model
Different image models are better at different jobs.
For a clean product image, you may want a model that handles product shapes and lighting carefully. For a stylized campaign visual, you may prefer a model that gives you more dramatic composition and color. For posters or layouts with text, you may want to test models that handle typography more reliably.
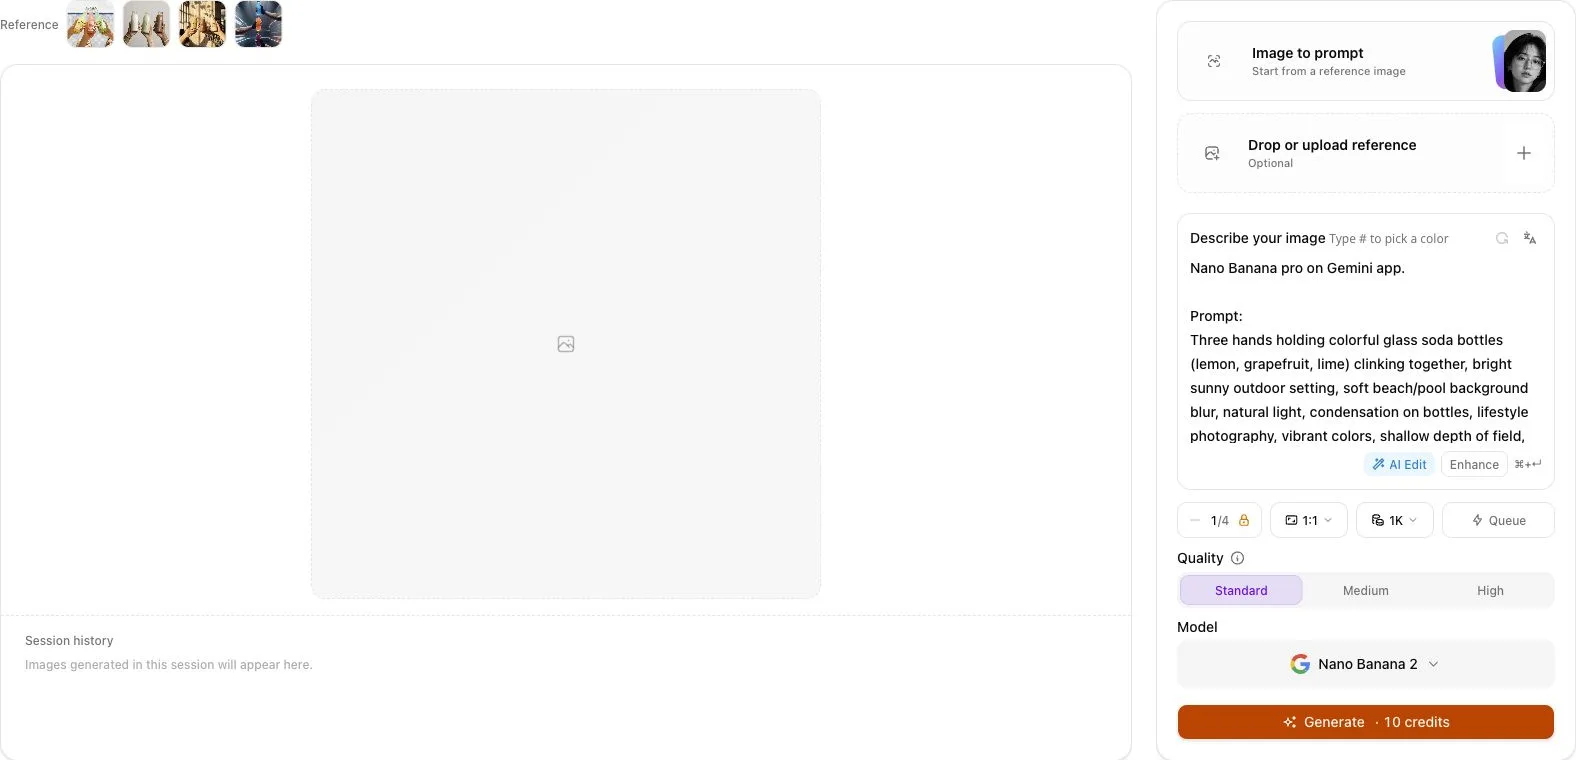
Inside ColabaseAI, the model choice is part of the workflow. You can start from the model attached to the gallery example, review the available models, or try another model if your output needs a different look.
A simple way to choose:
- Use a cleaner, more controlled model for product shots and ecommerce visuals.
- Use a more stylized model for posters, campaigns, and social creatives.
- Test text-heavy prompts separately, especially for ads, posters, or CJK layouts.
- When you are unsure, generate a few variations and compare the results side by side.
The goal is not to find one perfect model for everything. The goal is to pick the model that fits the job.
Step 5: Generate variations instead of chasing one perfect image
Your first generation does not need to be final.
In most real design work, the first image tells you what to adjust. Maybe the product is too small. Maybe the background is too busy. Maybe the mood is right, but the crop does not work for a landing page. Maybe the lighting is good, but the image needs more empty space for text.
Use each generation as feedback.
Try changing one thing at a time:
- Add "more negative space on the left" if you need room for copy.
- Add "plain background" if the image feels too busy.
- Add "front-facing product angle" if the product is hard to recognize.
- Add "mobile social media crop" if the visual needs to work in a feed.
- Add "no readable text" if the model keeps inventing letters.
Small prompt edits are easier to control than rewriting the entire prompt after every result. When you are ready to test the prompt, open Generate, choose the model and settings, and create a few versions to compare.
Step 6: Save the prompts and images worth reusing
Good prompts are reusable assets.
If a prompt gives you a strong visual direction, save it. You may want to reuse the same composition for a different product, another campaign, or a future blog post.
For example, one prompt structure can become:
- A launch graphic for Product A
- A seasonal campaign image for Product B
- A blog cover for a related topic
- A social ad with a different crop
- A poster with adjusted text space
This is where favorites and generation history become useful. You are not only saving finished images. You are building a small library of visual recipes that match your brand.
A simple workflow example
Let's say you need a visual for a product launch landing page.
The product is a compact desk lamp. The brand mood is calm, premium, and minimal. The image needs room for a short headline.
Here is how the workflow could look:
- Open the Inspiration Gallery.
- Find a product or poster-style image with a clean composition.
- Open the image and inspect the prompt.
- Keep the lighting and composition.
- Replace the original subject with "matte black desk lamp."
- Add "minimal desk setup" and "clear space for headline text."
- Choose a model suited for clean product visuals.
- Generate a few variations.
- Save the best result and the edited prompt.
A prompt like this is a good starting point:
Premium product launch visual for a matte black desk lamp on a clean wooden
desk, soft warm light, minimal background, editorial product photography, calm
premium mood, clear empty space on the left for a short headline, high detail,
no extra objects, no readable text.
From there, you can create different versions:
- A wider hero image for a landing page
- A square version for a product announcement
- A vertical version for social media
- A darker campaign version for a seasonal promotion
The first prompt is not the finish line. It is the reusable base.
Tips for better AI image prompts in ColabaseAI
Be specific about the job
"Create a nice image" is too vague.
A better prompt says what the image is for:
- "blog cover for an article about remote work"
- "product launch hero image for a skincare serum"
- "4:5 social ad creative for a summer campaign"
- "minimal app icon for a finance tool"
The use case changes the composition. A blog cover needs a clear focal point. A product shot needs product clarity. A poster needs hierarchy. A social ad needs to work quickly on a small screen.
Describe the crop early
If you know where the image will be used, include the format.
Examples:
- "wide hero image"
- "square social post"
- "vertical poster"
- "mobile-first ad creative"
- "centered product shot"
This helps the model make better layout choices from the beginning.
Give the image room to breathe
Many AI images fail because they are too crowded.
If you plan to add text later, ask for empty space:
- "clean background"
- "large negative space on the right"
- "simple composition"
- "minimal props"
- "clear area for headline text"
This is especially helpful for ads, blog covers, and landing page hero images.
Avoid asking for too many styles at once
A prompt can break down when it mixes too many directions.
For example, this is hard to control:
cinematic 3D watercolor editorial product photography anime poster luxury
minimal cyberpunk
Pick one main style and one supporting mood.
Better:
editorial product photography, minimal luxury mood, soft studio lighting
Save the prompt before you over-edit it
When a prompt works, save it before making big changes.
That gives you a clean version to return to if the next variation goes in the wrong direction.
Common mistakes to avoid
Copying a prompt without changing the goal
A gallery prompt is a shortcut, not a finished brief. If the original image was made for a poster, but you need a blog cover, adapt the prompt for the new format.
Changing everything at once
If you change the subject, style, model, lighting, crop, and mood all at once, it becomes hard to know what improved the result. Start with one or two changes.
Ignoring the model
The same prompt can behave differently across models. If the composition is good but the style feels wrong, try another model before rewriting the whole prompt.
Forgetting the final placement
An image for a website hero, a blog card, and a social post may need different crops. Think about where the image will appear before generating the final version.
FAQs
Do I need to know prompt engineering to use ColabaseAI?
No. The easiest way to start is to browse the Inspiration Gallery, open an example close to your goal, and adapt the prompt instead of writing one from scratch.
Should I copy gallery prompts exactly?
You can, but it is usually better to edit them. Keep the structure, composition, or style, then replace the subject, use case, and brand details.
Which model should I choose first?
Start with the model attached to the gallery example if you want a similar result. If your goal is different, choose based on the job: product clarity, stylized campaign visuals, typography, or layout control.
Can I use ColabaseAI for marketing visuals?
Yes. ColabaseAI is designed for practical visual work such as product images, ad creatives, campaign posters, blog covers, website hero images, and social media graphics.
What should I save after generating images?
Save both the final image and the prompt that produced it. A good prompt can be reused for future campaigns, new products, and different formats.
Start with a prompt, not a blank page
The fastest way to create better AI images is not to stare at an empty prompt box.
Start with a visual direction. Study the prompt behind it. Change the parts that matter. Choose the right model. Generate a few variations. Save what works.
That is the basic ColabaseAI workflow: inspiration first, prompt second, generation third.